Following an initial partnership agreement announced in 2016, Digital Surf and Bruker, a world leader in advanced surface metrology, have developed a fully integrated analysis solution based on the Mountains® platform, enabling unprecedented throughput for quality control in precision manufacturing. Samuel Lesko, Director of Technology and Applications at Bruker explains the process and highlights the benefits for users in industry.

Challenges in advanced manufacturing
The manufacturing and production industries have rapidly evolved over the past 10 years, faced with significant challenges both in finding resources to run production but also in manufacturing under tighter tolerances for surface texture and 3D feature dimensions.
The strict tolerances required in advanced manufacturing pushes the need to have very repeatable metrology systems as part of the manufacturing line. Oftentimes a robot is used to exchange parts between the production tool and metrology equipment, leading to a fully automated process that removes some of the variability found with human operators.
Through the same automation path, results from a metrology tool are transferred on to a central server that keeps track of trends or abnormalities (Statistical Process Control, SPC). This evolution is often referred to as Industry 4.0, where manufacturing is highly automated and directly integrated with surface metrology.
Features for quality control
The advanced precision engineering industry manufactures various parts ranging from medical (orthopedic hip cup, knee joint, etc.) to automotive (injector, cylinder, etc.) In any of these applications, areal texture and roughness, local flatness, as well as topographic defects or deviation of three-dimensional (3D) features play a critical role in meeting the certification compliance requirements for medical devices or efficiency/functionality for mechanical parts.
Industry 4.0 requires surface metrology tools that not only measure but also automatically generate and save reports with dynamic naming, log results in a database together with batch ID and/or part number and apply advanced 3D dataset processing to achieve the exact parameters required.
Integrating measurement automation and software analysis
To meet these requirements, Bruker and Digital Surf collaborated to enable full integration of measurement software acquiring data from a white light interferometry (WLI) optical profiler with Mountains® analysis software.
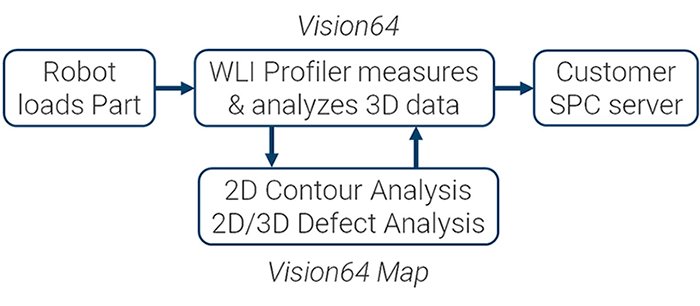
Robot inputs, such as part serial number or measurement conditions (objective, measurement mode, etc.) are transferred to Bruker’s Vision64 measurement software, and results such as diameter variation or classification of defects are obtained by direct communication with Vision64 Map analysis software (see figure below).

The measurement software seamlessly communicates with Digital Surf’s advanced surface and contour solutions in both directions. Through this bi-directional data exchange, the measurement software can automatically save and/or print a report for each measured part. It is also capable of reporting results to an SPC server via a comma separated variable (CSV) file.
Bruker’s WLI optical profiler contributes to the high throughput requirements with fast large areal topography measurement combining sub-nanometer vertical and sub-micron lateral resolutions. Paired with the particle analysis, defect classification and advanced contour capabilities of Vision64 Map, it provides an extremely powerful analysis solution, successfully meeting metrology automation demands.
Automotive injector inspection
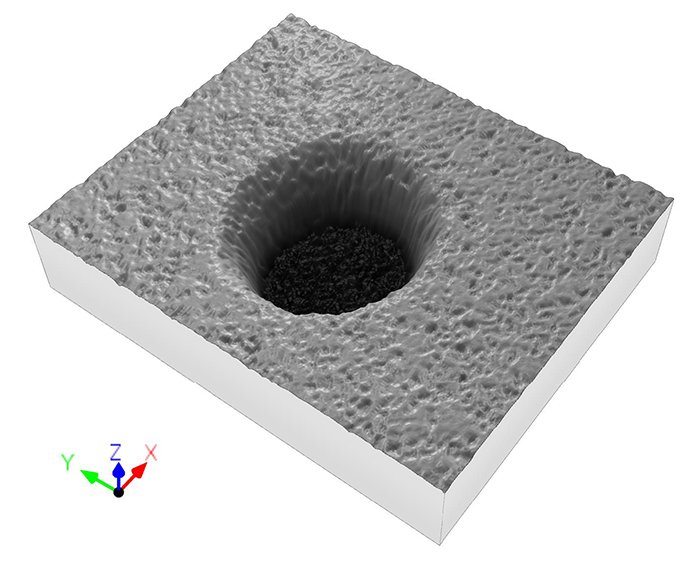
One example of this fully integrated process is the analysis of an automotive injector. This application requires the control of many aspects that are all equally critical for the part’s quality, based on a single measurement.


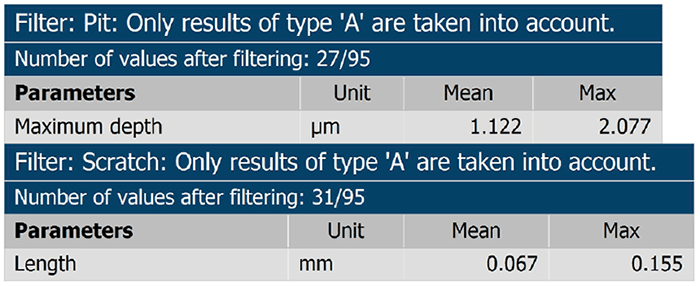
Above. Automotive injector inspection report with scratch and pits defect analysis on top surface
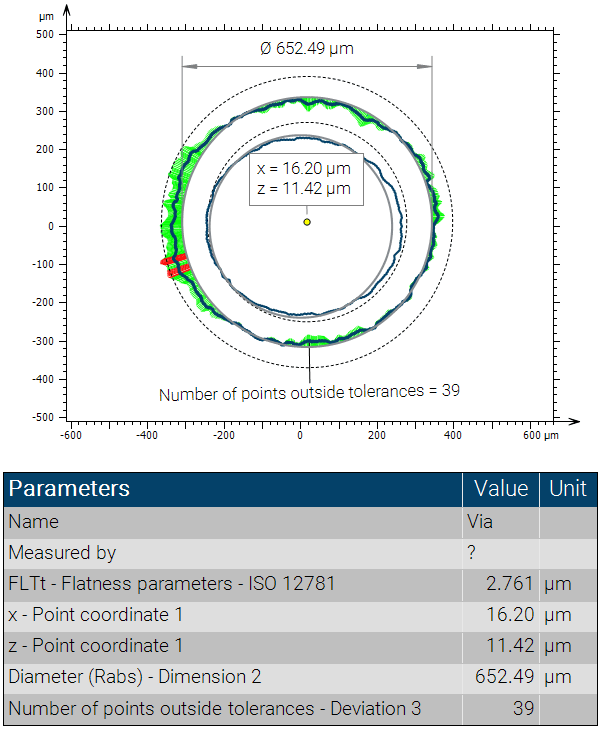
Diameter size and roundness with quantification of deviations are automatically assessed using advanced contour tools while flatness and vertical defects are screened by the parameters table and particle analysis features. Ranking of top surface defects is further established via the classification tool thus flagging up scratches, which can be responsible for leak paths.
Finally, the relative shift between top and bottom diameter is automatically calculated with the advanced contour tool.

Above. Deviation versus desired diameter
Conclusion
The full integration of Bruker’s WLI optical profiler acquisition system and Mountains® software analyses enables demanding quality control in advanced manufacturing processes. The success of this solution is based on a unique combination of flexible and robust analysis toolkits, such as particle analysis and advanced contour, together with high metrology performance. All together, these ingredients provide a sustainable agile solution to the challenges raised in Industry 4.0.
Learn more

Bruker 3D optical profilers: www.bruker.com/MetrologySolutions
![]()
Surface analysis software expertise: wwww.digitalsurf.revelateur.fr/software-solutions/profilometry