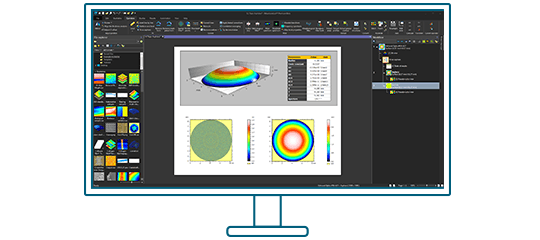
With Mountains® 8 comes an extended set of possibilities for accurately measuring any feature directly on image data from any instrument (SEM, SPM, profilometer etc.). Sonja Braun, in charge of technical writing at Digital Surf, highlights the new options available.

Performing distance measurements on collected data can be useful for a wide range of applications, in particular when working with microscope images including those from scanning electron microscopy (SEM) or scanning probe microscopy (SPM).
In Mountains® 8 the “Manual measurements” study replaces the previous “Distance measurement” and now includes more measurement tools. It calculates many more parameters, similarly to the Particle analysis study, including Area and Perimeter parameters. Let’s have a closer look with this scanning electron microscope image of pollen.
1. Image scale
One crucial step to look out for is setting your image to scale before making any measurements. In the Operators tab, choose “Scale the image” and use the graphical scale bar (dimension block) or the known length of any feature in the image to set correct dimensions.

Set scale
2. Coordinates of a point
In the Studies tab, choose “Manual measurements”. To show the coordinates of a point, simply click on the “Point” tool then on any place in the image. You can select and measure multiple points.
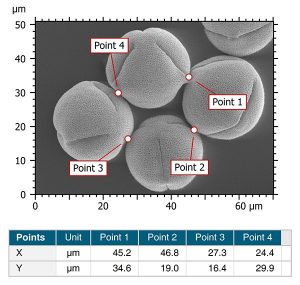
Coordinates of a point
3. Distance measurements
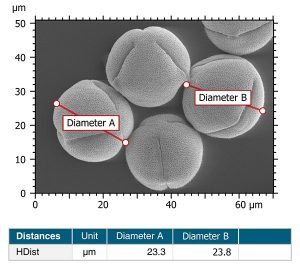
Distance between two points
Click on “Distance” and then click on two points in the image to measure the distance between them. Again, you may measure several distances simultaneously. Each movement of one of the points immediately results in an update of the coordinates in the table below.
4. Angles
Click on “Angle” then draw the angle by clicking on three points on the image.
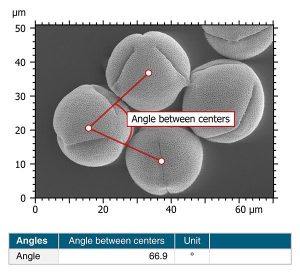
Angle measurement
5. Distance between parallel lines
Click on “Parallel lines” then click twice in order to define the position of the two parallel lines. You can move and rotate the lines.
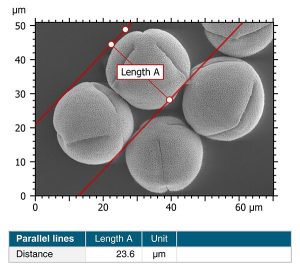
Distance between parallel lines
6. Shape measurements
Lastly, you can measure any shape you wish on your image data (rectangle, square, circle, ellipse, custom shape etc.). Click “Shape” then click to define the start point of the shape, and click again to define the end point. Use the handles to change the size of the shape.
Tip: To draw a square, hold down Shift while using the Rectangle tool. To draw a circle, use the Ellipse tool, without using the handles.
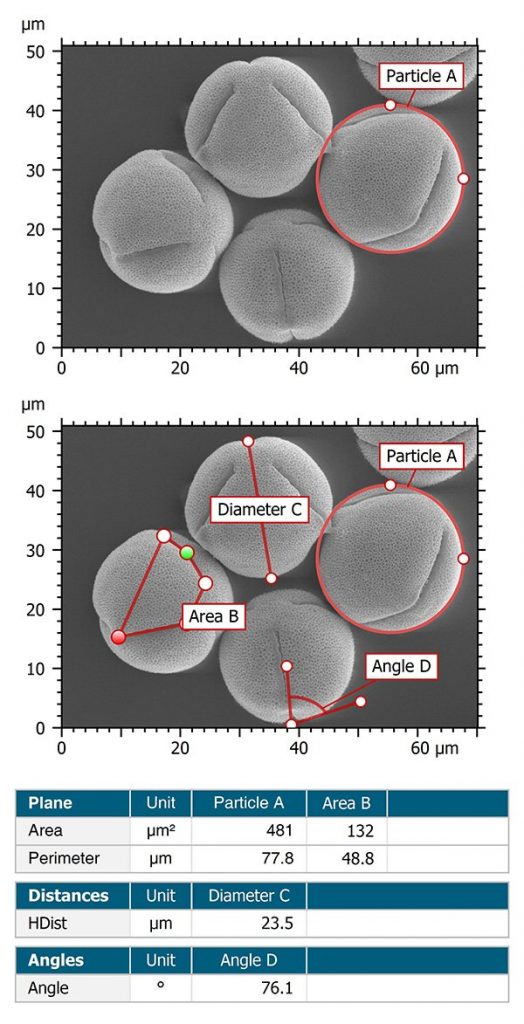
Custom shape measurement
(Note that several measurements can be made on one image)
NB. The Particle Analysis feature in Mountains® also provides automatic measurement tools for this type of data
Sounds good? Ready to try for yourself?
Try Mountains® surface analysis software for free